Showing posts with label Quick n' Easy. Show all posts

October 20, 2014

Chicken Seekh Kabab

Seekh kababs are the most popular type of kababs (atleast to my knowledge). I have tasted mutton seekh kababs before in some Indian restaurants but where I live, we get minced chicken very easily and so I thought I will try making seekh kababs using minced chicken.

One can surely try making lamb/mutton seekh kabab but the cooking time may vary as mutton/lamb take long time to cook. The chicken kababs were very juicy and tender and we finished all of it in few minutes. Let me know if you like the taste of it!


Ingredients:

Minced Chkn - 1LB
Onion - 1/2, finely chopped and sauteed
Cilantro - handful, finely chopped
Green Chillies - 1 small, finey chopped
Dhania Powder - 2 1/2 tspn
Garam Masala - 2 tspn
Red Chilli Powder - 1 tspn
Ginger - Garlic Paste - 1 tspn
Mint Leaves - 1 - 2 tspns, finely chopped
Bread Crumbs - 2 - 3 tbspns
Salt-  as per taste

Oil for frying (if not baking/broiling)

Procedure:

1.       Mix all ingredients given above, other than oil. Check to see if the mixture is thick enough and can hold up a sheek kabab shape (Cylindrical). If it doesn't, then add some more bread crumbs to it till it becomes easy to shape.
2.       Now make cylindrical shaped kababs by either rolling them around the skewers (make sure wooden skewers are soaked in water for atleast 30mins before using them) and bake/shallow fry in a pan for 10-12mins or until done (or broil for 5mins on each side).
3.       I did not use any skewers but just shaped them in cylindrical shape and shallow fried them in a pan with 1 tspn oil. I also BBQed these kababs and they turned out awesome!
4.       Serve/Eat this with mint chutney mixed in greek yogurt and some sliced onions with lemon squeezed on top. YUMMMM!!!!


Conclusion:
I made these for my hubby's Bday BBQ and I got rave reviews for them. It got over in no time!


May 14, 2014

Baked Asparagus Fries

My 2nd post for Earth Day... I am excited to write and publish this!

I went to Costco few days ago and bought a big bag of Asparagus and then I came across these baked Asparagus Fries pic on Pinterest. I knew immediately what I am going to do with my big bag of Asparagus. I didn't have breadcrumbs on me so I made it myself. But they turned out nice and crunchy! I didn't expect it to be so simple to make and so yummy to taste.

I served it with Spicy Sriracha Dip!


Ingredients: 
Asparagus Spears - 15-18
Bread Crumbs - 1 cup
Egg, beaten - 1
All Purpose Flour - 1/2 cup
Red Chilli Powder - 1 tspns
Salt

Procedure: 
1. Preheat oven on 350 F
2. Mix salt and red chilli powder in breadcrumbs
3. Dip Asparagus spears in flour, then in egg wash and then in breadcrumbs. Repeat this process for all the spears and bake on a cookie sheet for 12-15mins

Variations: 
You can make this recipe with some variations like adding spices to the crumbs

Conclusion:
Crunchy Asparagus Fries dipped in Spicy Sriracha sauce tastes really great. This simple recipe goes with all kind of food.

March 13, 2014

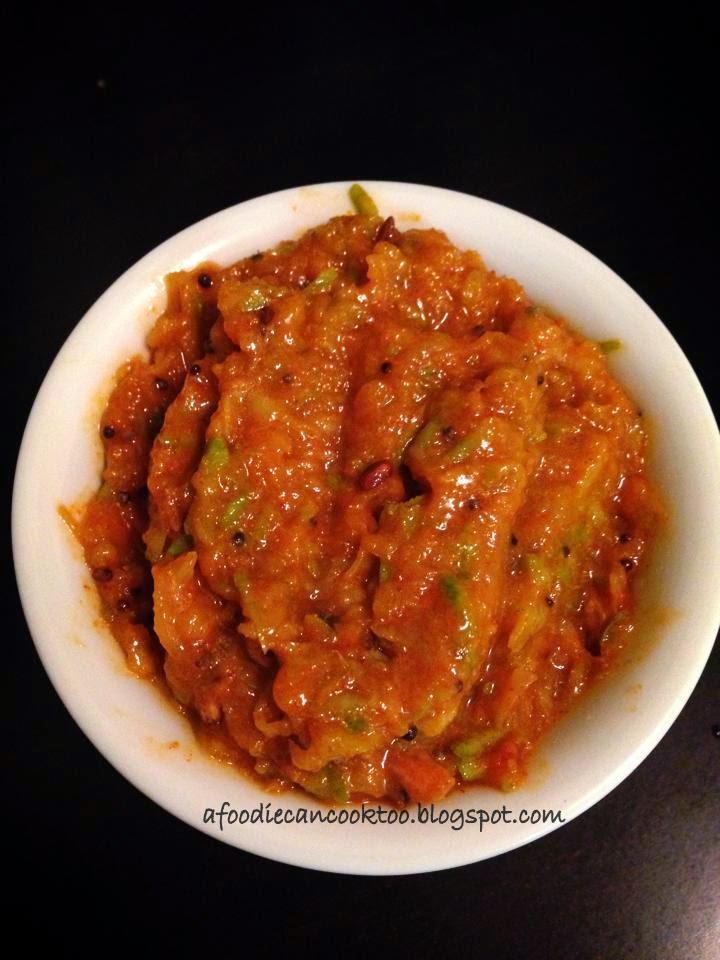
Takku/Raw Mango Pickle

I went to Indian store recently and found raw mango in the veggies section. I bought just one thinking of making onion chutney out of it but then I ended up making 'Takku' - Marathi word . My Maternal Grandma used to make Takku during summer on a large scale as she had to send to all her daughters (3) and daughter-in-laws (6) and other close relatives. I still remember the taste of her takku and this recipe came close to what she used to make.


Let's hope you all try and like it too!

Ingredients: 
Raw Mango, grated - 1 (grate with peel on)
Red Chilli Powder - 3 tspn (depending on how hot the chilli powder is)
Turmeric - 1/4 tspn
Salt
Sugar - 1/2 tspn

Tampering
Oil - 2 tspn
Mustard Seeds - 1/2 tspn
Cumin Seeds - 1/2 tspn
Garlic - 1/2 tspn


Procedure: 
Mix all ingredients given above other than the one for tempering. Heat oil in a small pan and add mustard seeds, cumin seeds and let it crackle. Then add garlic and fry till it is golden brown in color.

Add the tempering to the mixture of raw mango and spices and mix it well and adjust salt/sugar as per your taste.

Variations: 
You can use any other vegetable like carrot, amla, etc. instead of raw mango but trust me raw mango tastes the best.

Conclusion:
Relish the yummiest takku you just made with curd rice or roti sabzi!

March 9, 2014

Chocolate Nutella Mug Cake... Prep, Cook & Devour in just 5 mins!!!

It was a rainy evening and I was craving for Nutella Hot Chocolate but instead I made this really yummy, decadent and super easy cake in a mug which can be made in microwave. It takes only 5 minutes to prep, cook and devour!


My husband and I have sweet tooth and crave for dessert every night. If he doesn't find anything, he eats a chocolate or spoonfull of Nutella. One day I came across this recipe which has both Nutella and chocolate and I have been a big fan of this recipe since then. So I decided to share it with you guys so that you can make this whenever you crave for dessert :). Absolutely decadent and sooo easy to make!

Makes one mug full which can be easily finished between 4 but I would say just share with your loved one ;)

Ingredients: 
All Purpose/Self rising Flour - 4 tbspn
Sugar - 4 tbspn
Unsweetened powder - 2 tbspn
Nutella - 3 tbspn
Egg - 1
Milk - 2 tbspn
Oil - 3 tbspn
Baking Powder - 1/4 tspn (if you are using All Purpose Flour)

Procedure: 
Make sure you have a big coffee mug. Combine all ingredients and mix well. Microwave for 1.5 mins on high power (It varies based on microwave) and that's it!! Serve warm with whipped cream or ice cream.

Note: Make sure you watch it closely while it is cooking in microwave and stop it when it is nicely risen (approximately 1.5mins).


Variations: 
You can distribute it in 3-4 ramekins and cook it for 30-40 secs each. It will serve up as individual dessert cups.

Conclusion:
Really decadent chocolate cake made within minutes and devoured in seconds ;)


March 4, 2014

Sweet Potato Pudding / Ratalyacha Halwa

I fast once a year which is for Mahashivratri. We are followers of Shiva and hence we have big celebrations back home on Mahashivratri. Mom used to make Sabudana khichdi (Savory Sagoo) and Bhagar (varai). Sweet potato was one of my favorite items during fasting. I used to eat it with milk and sugar.

Sweet potato in India are not orange in color, they are yellowish. They are not as sweet as the ones you get here but they are really yummy.

On Mahashivratri, I had invited a friend of mine for dinner and I wanted to make something else other than usual things. So I decided to make 'Ratalyacha Halwa'/ 'Sweet Potato Pudding' and trust me it turned out yummmmy! You must give it a try too even if it is not Mahashivratri.


Ingredients:
Raw Sweet Potato, grated - 1.5 cup
Sweetened Condensed Milk - 4 tbspns
Ghee - 2 tbspns
Elaichi Powder - 1/4 tspn
Nuts (Pistachios, Cashewnuts, Almonds), crushed - 1 tbspn

Procedure:
Heat a pan and add ghee to it and when ghee is heated, add the grated sweet potato to it. Sauté it well until its nicely cooked (10mins maybe). Then add rest of the ingredients and cook for another 5-10mins. or till it is soft and mushy.

Variations:
I would not want to make any variations to this dish. It turned out to be so awesome that I am going to make it again soon.

Conclusion:
It was over in one go. A super hit I must say!

February 5, 2014

Cajun Shrimp Quesadilla

These days I prefer to try some quick entrees as it will be useful for my blog readers to try them out and also for me when my baby is cranky and doesn't let me cook ;). Although he is a calm baby with very little sleep, he gets bored easily if there is no one to entertain him.
Shrimp quesadilla is one of the quick and easy entrees to try out. You can experiment a lot with the ingredients and try to make as per your palate.


Ingredients: 
Medium Soft Tacos - 4
Peeled and deveined Shrimp - 12-15 medium sized
Red/Yellow/Green Bell Pepper - 1
Onion -1 medium
Sour Cream - 2 tbspn
Store bought salsa - 3 tbspn
Mexican Blend Cheese - 1 pack
Cajun Spice - 2 tspn
Salt & Pepper as per taste
Oil

Procedure: 
  1. Cut the shrimp into small pieces and marinate it with the cajun spice and some salt.
  2. In the meantime, sautee the onions and bell peppers till they are soft and add salt and pepper as per taste.
  3. Now sautee the shrimp till just cooked (make sure it's not chewy)
  4. Mix sour cream and salsa and mix it well and keep aside
  5. Heat a pan and put a soft taco on it and keep the heat to low. Now sprinkle some cheese on one half of the taco and add the sauteed onions, peppers, shrimp, sour cream and salsa mixture on the same half side of the taco. Now sprinkle some more cheese on top and cover the taco with the other half and heat the other side till cheese melts. 
  6. Serve the hot and spicy quesadilla with homemade Guacamole. 


Variations:
You can add any other meat instead of the shrimp or go veggie by completely omitting the meat. I liked the veggie creation as well which I made for my mom.

Conclusion:
Happy tummies and in future baby will be happy too.

Pesto Cream Cheese Filled Chicken Roll Ups

After a long long time, I am back to blogging. These days it is so difficult to find time to do anything due to the adorable little darling who is 1 year old already!

We also visited our family and friends in India in Dec 2013. This was Neil's first trip to India and he did pretty well. Everyone enjoyed his company a lot especially Neil's cousins and grand parents.


We had bought a house in India and we got the possession of it, so we did a small Housewarming Ceremony.

All in all, it was a great month long vacation!

Alright, coming to the point - I found the pictures of this dish on Pinterest and just decided I will wing it as per my taste. So I added some cream cheese and pesto and rolled up the chicken. Next I am going to try it with mushrooms stuffed inside and some sauce on top of the chicken. For now, let's enjoy what we have :)

Ingredients: 
Chicken Breast, Pounded - 2
Basil Pesto - 4 tbspns
Cream Cheese - 2 tbspns
Salt
Pepper
Bread Crumbs - 1/2 cup
Toothpicks

Procedure: 
  1. Preheat the oven to 350F
  2. In the mean time, take the pounded chicken breasts and cut each piece into 3 parts lengthwise
  3. Now spread the cheese and then the basil pesto on it. Sprinkle some salt and pepper on top of the pesto and roll the chicken breast like a swiss roll
  4. Now tuck some toothpicks inside the roll to keep it rolled and cover it in breadcrumbs and bake for 35-40 mins (or till chicken is cooked)
  5. Last but not the least, relish every bite of the juicy chicken roll ups with some cajun spiced asparagus and squash.


Variations: 
There are plenty of variations to this recipe. I also added some sauteed asparagus with tomato paste, basil pesto, and mozzarella cheese and rolled it up. It tasted really delicious too!

Conclusion:
Add whatever filling you want, roll it up and roll it into your mouth....yummm!! My mouth is watering now. I better go and have a bite of the leftover chicken roll ups.

February 4, 2013

French Toast

Brunch time special french toast can be easily made at home. I realized a little late that I can make it at home the way I like it and earn some brownie points from the hubby and others too. With this in mind, I decided to give it a try. I recently made Scrumptious Chocolate Pecan Bread Pudding and thought that French toast can be made with similar ingredients.

To suffice my craving for brunch time food that I usually order at any restaurant, I decided to make it at home (cost efficient and also because of my newborn baby I couldn't go out very often).

Ingredients: 
Thick Bread slices - 4
Eggs - 2
Milk/Fresh Cream - 1/2 cup
Ground Cinnamon - 1/8 tspn
Ground Nutmeg - 1 pinch
Sugar - 1 tbspn
Vanilla extract - 1/2 tspn
Powdered Sugar - 1/2 tbspn

Procedure: 

  1. Beat eggs, milk, sugar, vanilla extract, ground cinnamon and nutmeg till well mixed. 
  2. Heat a griddle on medium heat and spray oil on it
  3. Now dip the bread slices in the egg mixture on both sides and place it on the griddle. Cook on both sides till it becomes golden brown.
  4. Sprinkle some powdered sugar and drizzle some chocolate syrup on top and serve it with your choice of fruits and maple syrup (if desired).

Variations: 
Sugar can be adjusted as per your taste. Also, spices can be added or removed to suite your taste buds.

Conclusion:
No need to go to the restaurants for french toast anymore :). I can try new things at brunch now.

February 25, 2012

Tiramisu - afoodiecancooktoo's First Anniversary Special


It was a foodie can cook too's first anniversary and I totally forgot about it - Yes, it was my biggest blunder ever! I posted my first blogpost on Jan 19th 2011 and I was super excited about it. I remember the first few days when I used to just think about the different things I could try and post on my blog, how I could enhance my photography skills so that the pics look more professional and so on. I even bought some nice plates and bowls and some other decorative stuff.
To make it up for the forgotten first anniversary of my blog, ,I decided to make Tiramisu and so I go and get all the ingredients and decide to make one and write the blogpost as well. But then I found some time to finally write the post and post it. Phew! It has been a very busy month.
Anyway, this Tiramisu was made sipping on some Chianti (2005) and definitely gave better results ;-). Try that some time.


Ingredients: 
Soft Lady Fingers - 24
Mascarpone Cheese - 8 oz
Whipped Cream - 1/3 cup
Vanilla essence - 1/4 tspn
Eggs, separated - 3
Sugar - 1/2 cup
Salt - a pinch
Chocolate Liquor - 2 tbspns (Optional)
Instant Coffee - 2 tbspns
Hot Water - 1.5 cups
Cocoa Powder/chocolate shavings - 2-3 tbspns
Marsala Wine - 3 tbspns (Optional)


Procedure:
  1. In a big bowl, beat sugar, vanilla essence and egg yolks together for 2-3 mins or till it is pale yellow in color. Add mascarpone cheese to it and beat till it is well blended and fluffy (a min or so).
  2. Mix the coffee powder in hot water till it dissolves and let it cool. You can use espresso instead.
  3. Then, beat the egg whites with a pinch of salt in a clean bowl with a clean beater (not even a drop of water) till stiff white peaks form. Also, in another big mixing bowl, beat the whipped cream till peaks  form.
  4. Now mix the mascarpone-egg yellow mixture in whipped cream and then add 1/3rd of the beaten whites and mix well. Now fold in all the whites and just mix well.
  5. Now mix the chocolate liquor and marsala wine in the coffee mixture and keep it aside,
  6. In a martini glass or a bowl, place the lady fingers as a layer and sprinkle/brush the coffee+Marsala+liquor mixture and then spread an even layer of the whites+mascarpone+yellows mixture. Sprinkle cocoa powder or chocolate shavings. Repeat this once or twice more.
  7. Store it in the refrigerator for at least 24hours and then DIG IN and RELISH!!!
Variations:
Feel free to make changes to this recipe and experiment with your Tiramisu. I am sure you would love the end result ;-)


Conclusion:
I invited a bunch of friends over to celebrate this occasion and Oh Boy, it got over in a few minutes ;-). It was the best Tiramisu I ever made (I have tried once before but wasn't the best attempt)

October 18, 2011

Butter Paneer Naanizza / Indian Style Pizza

I usually try to make things out of what I have in the inventory and/or what is perishable. So I had half of store-bought Paneer Packet left and some Naans. I remembered the Butter Paneer Pizza I had in San Jose when I went for a very good friend's Birthday Party. We had surprised her by visiting her all the way from Los Angeles.
Her Fiancee had organized the Birthday Party for her and had ordered Butter Paneer Pizza. It was sooo good that it got over in a few minutes.
So I thought I would try to make something similar with the ingredients I had.

Ingredients (for 4 people):
Paneer, pea sized cubes - 2 cups
Green Bell Peppers, 2" sliced - 1
Onions, sliced - 1
Ginger-Garlic Paste - 1tspn (Optional)
Tandoori masala - 2Tbspn
Chicken Curry Powder - 1Tbspn
Red Chilli Powder - 1 tspn
Kasuri Methi - 1tspn (Optional)
Butter - 2Tbspn
Ketchup - 6-7 tbspn
Naan - 6
Mozzarella Cheese, shredded - 3 cups


Procedure: 
  1. Pre-heat oven on 350 degrees.
  2. Add Butter to pan and saute onions, bell peppers and ginger garlic paste for 2mins (Do not cook it). Then add Paneer and other ingredients and sautee for another 2mins. 
  3. Spread ketchup on the Naan and distribute the mixture on the Naan evenly and sprinkle cheese on top
  4. Now place the Naans in the oven for 8-12mins or till cheese has melted.
Variations: 
You can add chicken instead of Paneer. In that case, use cooked chicken breasts for best results.


Conclusion:
I was astonished with the results. They were yummy and were made in 20mins only.

August 16, 2011

Paneer Tikka Panini

Cafe Coffee Day was the all time hang out place for me and my friends. I loved the Tropical Iceberg there. I remember having this Paneer Tikka Panini there and OMG, it was very yummy. But I did not have enough motivation and a kitchen to try it out (I used to live in a hostel in Navi Mumbai where I had an electric hot plate to warm milk and make khichdi). I still remember the taste of that panini and I had everything handy, so I decided to try it out on a Tuesday morning (7am) for my lunch box.

Ingredients: 
For Stuffing
Paneer/Cottage Cheese, small cubes - 1 cup
Bell Peppers, 1" cubed - 1 cup
Onions, 1" cubed - 1 cup
Tandoori Masala - 2 Tbspn
Red Chilli Powder - 1tspn
Ginger-Garlic Paste - 1/3 tspn
Coriander Powder - 1 tspn
Yogurt - 1 Tbspn
Salt

For Panini
Bread Slices - 4
Mint Chutney (optional)
Butter to spread on the bread
Cheese, grated - 1 cup (I used 4 cheese blend as it was handy)


Procedure: 
Mix all the ingredients for stuffing and keep aside. Now spread some mint chutney on the bread slices on one side and butter on the other. Heat a pan and add the stuffing mixture to it. Cook it for 5-8mins or till paneer is tender and onions and bell peppers are crisp. Evenly distribute this stuffing to the bread slices with butter side being out and mint chutney on the inside. Now sprinkle some cheese on the stuffing and grill the sandwich till the bread turns golden brown.
Serve this with some ketchup or mint chutney.

Serves - 1 person


Variations: 
Make it a kids favorite by using less masalas and adding more cheese to it. They would definitely love it!

Conclusion:
It tasted just like the Cafe Coffee Day's Paneer Tikka Panini. How I wish I could pay a visit to India to see my Family and friends and hang out at CCD :)

July 27, 2011

Orange Chicken Salad - Revealing Secrets

An Irish proverb says "A good laugh and a long sleep are the best cures in the doctor's book" but I would correct it to "A good laugh, a healthy diet, a long walk and a long sleep are the best cures in the doctor's book." We need not keep on worrying about our health all the time because that is more dangerous than eating unhealthy food. One must enjoy the good health they have rather than worrying about it.


Eating right and eating at the right time is the trick. 
You need not eat salad everyday to be healthy, you need not starve to reduce your weight, you need not eat bad tasting food to be on diet! All you need to do is, eat right and eat at the right time.


Know what you eat.
To eat right, you must know what you are eating. So wear your apron and get started in the kitchen. You can start with small things at a time. Even if you eat out, make sure you know the ingredients and opt for healthy choices like wheat bread instead of white, grilled chicken instead of fried chicken etc.


Refresh your mind and body.
Exercise refreshes your mind and body. Just 30-60mins of exercise/day is enough for a healthy mind and body. It doesn't matter if you walk to the grocery store or you run on a treadmill in the gym. The important thing is to exercise and be happy. 


Don't Be a Couch Potato.
Go out, make some friends, eat out, drink some beer, go for a comedy show but remember to exercise and stay worry-free. 

Ingredients (1 serving): 
Raw Items:
Spring Mix - 1/8 LB
Red and Orange Bell Pepper - 1/2 cup
Garbanzo Beans, canned/cooked - 1/2 cup
Mandarines - 1/2 cup
Toasted Sesame - 1/2 tspn
Chicken Tenders - 1/2LB

Dressing:
Soy Sauce - 3Tbspn
Lime Juice - 2Tbspn
Extra Virgin Olive Oil - 2Tbspn
Brown Sugar - 2tbspn
Black Pepper Powder - 1/4 tspn
Salt - a pinch full
Garlic, minced - 1tspn
Oil/Butter for frying garlic
Orange Juice - 1/8 cup

Procedure:
  1. Mix all the ingredients for dressing other than garlic and oil for frying.
  2. Now, heat a small pan and add oil to it. Fry garlic till they are golden and add to the above mentioned dressing mixture.
  3. Now grill/broil/cook the chicken tender with some salt and pepper 
  4. Add 1/2 of the prepared dressing to the chicken and let it sit aside.
  5. Add orange juice to the remaining 1/2 of the dressing and mix it well.
  6. Now mix all the raw ingredients and put the orange dressing on top of it. Add the chicken on top and garnish with some toasted sesame.
Variations: 
It can be made veg by taking off the chicken and adding Tofu/Soy chunks.


Conclusion:
Today I got up early so that I can pack this for lunch and blog about it in the spare time. I am going for Dodger's baseball game tonight (just to hog on the garlic fries and chug some beer as I do not understand the game :) ). So I am compensating for all the junk food I will be eating tonight with the salad.

April 15, 2011

Shrimp Stir Fry

Every time I make shrimp I remember 'Bubba' from Forrest Gump. His love towards shrimp and how he spoke about them all the time. I remember that Bubba suggests the shrimping business and Forrest pursues the idea after Bubba's death.
The Bubba Gump Shrimp Company started as an idea between Bubba and Forrest during their war duty in Vietnam. There Bubba proposes the idea of starting a shrimping business and Forrest agress and promises to be his partner after the service is over. But Bubba dies in the war and Forrest is left alone to go into that business. Forrest then goes to plays in the All America Ping Pong team and after his tour, he earns $25,000 enough to buy a boat. He buys a boat and names it 'Jenny'. This is how he starts the shrimping business and Lt. Dan Taylor joins him as his mate on the boat.
It is a pretty nice movie and Tom Hanks has acted really well and so has 'Bubba.' I think pretty soon, I will be called 'Bubba.'

Ingredients: 
Uncooked Shrimp, deveined - 1 LB
Soy Sauce - 2 tbspn
Tomato Ketchup - 4 tbspn
Water- 5tbspn
Red Chilli Flakes - 1 tspn
Ginger Paste - 1/2 tspn
Garlic, Minced - 2 + 4 cloves
Honey - 2 tspn
Cornstarch - 2 tspn
Green Onions - 1/4 + 1/4 cup
Bell Peppers - 1 cup
Brocolli - 1 cup
Mushroom - 1/4 cup
Oil

Procedure: 
  1. Mix all the sauces, water, honey, red chilli flakes, 2 garlic cloves, cornstarch and ginger paste and keep it aside.
  2. Now heat a skillet on med-high heat and put a tbspn oil on it. Then add garlic and all the vegetables and green onions to it and cook it for 2 mins. Then add the sauce to it and cook for 3-4 mins or till the sauce begins to boil.
  3. Now add the shrimp and cook till the shrimp is cooked.
Variations: 
You can make it vegetarian by substituting shrimp with Tofu or Paneer/Cottage Cheese.

Conclusion:
The 'Always-Available-At-Home' ingredients makes it unbelievably awesome stir fry.

April 9, 2011

Creamy Cauliflower Soup


I am a soup lover and make soup at home very often. I became a soup lover because I love to eat or drink hot things during winter and in US of A, it is always cold, even in California. So I make a big pot of soup once a week and have it with lunch or dinner.
Today I only had cauliflower and wanted to make some soup out of it. So I called a friend of mine and she gave me her recipe.

Ingredients: 
Cauliflower - 1LB
Sliced Onion - 1/2 cup
Potato, peeled and cubed - 1
Ginger Paste - 1tspn
Garlic - 3 cloves
Black Peppercorns - 8-10
Green Chillies - 2
Milk - 1 1/2 cups
Red Chilli Powder - 1/2 tspn (Optional)
Water or chicken or vegetable stock - 3cups
Salt to taste

Procedure: 
  1. Cut and clean the cauliflower. Pressure cook all the above ingredients with 3 cups of water or chicken or vegetable stock. (I used water as I didn't have the broth handy)
  2. Take 2 whistles and when cooker is cooled, blend the cauliflower mixture into a smooth paste.
  3. Now add some milk and blend again.
Variations: 
My friend said that she gives a 'tadka' of oil and jeera to add some flavor to it. I didn't want to add oil to the soup so I skipped that step.

Conclusion:
When I told my husband that I am making cauliflower soup, he made faces but when I made him taste it, he loved it. Even I was surprised with its distinct taste.... very creamy without adding butter or cream. One cannot make out that it is cauliflower soup. Thanks to Louloua (Pronounced as Lulua) who suggested this soup and gave me the recipe.


Rice Pudding/Rice Kheer/Narali Bhaat

Happy Gudi Padva/Ugadi to one and all. I know I am a little late for that but that is when I made the Rice kheer. My mother makes a variety of rice kheer and I love all of them.
'Rakshabandhan' or Rakhi Pornima and Narali Pornima are celebrated with Narali bhaat at my place. I used to wait for Rakhi Pornima just to hog on the narali bhaat, and the gift ofcourse.
On the occasion of Gudi Padva, which was a Monday, I wanted to cook a full meal with some sweet and I had all the ingrdients handy for Narali Bhaat :). The menu for Gudi Padva was Paneer Bhurji, Daal Fry, Lachcha Paratha, Rice and Narali Bhaat.

Ingredients:
Rice - 1/2 cup
Condensed Milk - 1 small can
Coconut Milk - 1 cup
Milk - 1 cup
Cardamom/Elaichi Powder - 1/2 tspn
Cashews, chopped - 7-8
Shredded Coconut - 1/2 cup

Procedure:
  1. Overcook the rice with more water to make it mushy.
  2. Add coconut milk, condensed milk and cashews to the rice and cook it for 10 minutes on med-high heat till it is thick in consistency.
  3. Now grind coconut, and some rice and cashews together and add it to the kheer.
  4. Now add the milk and some sugar if need be and cook for another 5-8mins.
  5. Add Elaichi and Kesar (Optional) and serve chilled.
Variations: 
You can add almonds instead of cashews and it will still taste great. Also, if you do not have condensed milk, no worries add sugar as per your taste and cook the mixture for some more time.

Conclusion:
Yummilicious kheer or Narali Bhaat. We ate it for 3 days and still I am craving for some as I am writing this.


March 7, 2011

Daal Palak / Gargatta / Spinach with Lentils

Solapur falls on the border of Karnataka and Maharashtra, although it is a part of Maharashtra. The Andhra Pradesh border is not too far either, so we have Marathi, kannada and Telugu speaking people. The favorite food here is Jowar Bhakri, Gargatta (Daal Palak), Bharli Vangi and Shenga Chutney. Every 'Lingayat' wedding will have this on their menu.
My mother is very famous for her gargatta. All the lingayat and non-lingayat people crave for it and so do I. When I went to India after a year, I had a list of food items I wanted to eat and Gargatta/Daal Palak was second on the list, first being Puran Poli. I try and make close to what she makes, but I lack the motherly love which makes it taste fantastically awesome! Love you, Mom!

Ingredients:
Palak/Spinach, Cleaned and Chopped – 1 bunch/packet
Toor Daal – ½ cup
Masoor Daal – ¼ cup (If not available, substitute with toor or moong daal)
Onions, sliced - 1
Peanuts – 1 fistful (Optional but recommended)
Goda Masala – 2 tbspn (Levelled)
Red Chilli Powder – 1 tspn
Tamarind – 2” piece (Soaked in water for an hour)
Jaggery – 1 tbspn
Jeera/Cumin Seeds – ½ tspn
Garlic – 4-5 pods

Procedure: 
  1. In a pressure cooker, boil daal, palak, peanuts and onions together . Take 2-3 whistles.
  2. After the steam is gone, open the cooker and add goda masala, red chilli powder, pulp of tamarind, jaggery, garlic and jeera and boil it for another 5 minutes or till it is thick enough. Make sure it is a little thick in consistency.
  3. Isn’t it super easy?!?
Variations:
You can add variety of lentils to it and it still tastes awesome!

Conclusion:
Every time I make Daal-Palak, I miss India and home!

March 2, 2011

Gujrati Kadhi/Yogurt Soup

Kadhi for my American friends is 'Yogurt Soup.' I was laughing out loud when I heard this from a friend. But that, logically, made sense.
I always liked sweet and spicy food. My mother, on the other hand, loves hot n' spicy food. So she never made the Gujarati version of Kadhi. Once I decided to make kadhi as my mom makes. By mistake I used the sweet yogurt and the kadhi turned out to be a sweet n' spicy kadhi. The taste of it was so good, that I kind of stuck to that recipe! I actually drank that kadhi as soup - aptly called as 'Yogurt Soup.'


Ingredients: 
Plain Yogurt - 2 cups
Besan / Gram Flour - 2 tbspn
Green Chilli - 2, finely chopped/paste
Ginger - 1.5 tspn
Turmeric/Haldi
Water 1/2 cup
Sugar - 1tbspn
Salt

For Tadka:
Jeera/Cumin Seeds - 1/2 tspn
Rai/Mustard Seeds - 1/2 tspn
Kadipatta / Curry Leaves - 5-6 leaves
Hing/Asafoetida - 1/4 tspn
Bedgi Mirchi/Red Chilli - 3-4
Oil/Ghee - 1 tbspn
Cilantro - 1 tbspn

Method of Preparation: 
  1. Mix Yogurt and water in a heavy-bottomed vessel. Then add the besan to it and beat well to blend it together. Make sure there are no lumps in the mixture.
  2. On medium flame, heat the mixture for a minute or so.
  3. Now add turmeric/haldi, green chilli paste and ginger paste to the mixture.
  4. Let the mixture be on medium flame till it starts boiling. Let it boil for 2-3 minutes more so that there is no raw taste of besan.
  5. Add salt and sugar to the kadhi and boil for another minute then turn off the heat.
  6. In a wok, heat some oil and then add hing, mustard and cumin seeds till they crackle. Then add kadipatta and then red chillies and add this to the kadhi and close it with a lid.
  7. Serve it with rice and some spicy vegetable or just drink it as 'Yogurt Soup.'
Variations: 
You can vary the amount of sugar as per taste. Also, you can add laung/Cloves for some more spicy taste. It is really good for cold and cough.

Conclusion:
Perfect sweet n' spicy kadhi for a cold foggy night!

February 24, 2011

Rajma Do Pyaza

As a student in US of A, my husband always made Rajma. I would rather say all the students make Rajma as the canned kidney beans are easily available in any grocery store. One need not visit the Indian grocery store and go through the pain of soaking it overnight and then pressure cooking it.
Whenever I feel want my husband to cook, I ask him to make Pasta or Rajma (These two things are tried and tested on his 6 other room mates, so it's safe!) He makes it really simple and easy and we eat it with rice. Today I was at home and wanted to try some new style Rajma and so I did some research online and mixed and matched all the ingredients I liked from every recipe and added my own ingredients too.

Ingredients: 
Red Kidney Beans/Rajma - 2 cups
Onions (Sliced) - 1 large
Green Chillies (Chopped/slit) - 3
Tomato (Finely Chopped) - 1
Ginger-Garlic paste - 1 tbspn
Coriander/Dhaniya Powder - 1tbspn
Cumin/jeera Powder - 1tspn
Cumin Seeds/jeera - 1/2 tspn
Kasuri Methi - 1tbspn
Garam Masala - 1tbspn
Red Chilli Powder - 1 tbspn
Yogurt - 2 tbspn
Salt to taste
Oil - 3 tbspn


Method of Preparation:
  1. Soak the Kidney beans / Rajma overnight and pressure cook it with 3-4 cups of water and take one whistle. I used 1 can of chilli beans instead.
  2. Heat the oil and put cumin seeds, then add onions to it and saute till they become brown/semi-translucent.
  3. Now add green chillies and ginger-garlic paste and saute it some more. 
  4. When the onions become brown in color, then add tomatoes to it and cook it for 2 minutes.
  5. Now add red chilli powder, cummin powder, coriander powder and kasuri methi to it and cook for 2-4 minutes.
  6. Now add the beans, salt, yogurt and 1 and 1/2 cups of water and mix well and cook for 8-10 minutes on med heat.
  7. Garnish with Cilantro and serve with rice or parathas.
 Variations: 
Add some lime juice and chaat masala for a tangy tingling taste.

 Conclusion:
The Rajma turned out really yummy. My husband rewarded me with some yummy pastry. Please try the recipe and provide feedback.

February 17, 2011

Tandoori Paneer Tikka

When I was a child, my family rarely visited the restaurants. We did not have a 'Once-in-a-week' restaurant schedule like other families. But when we went, we always ordered a sabzi with Paneer and daal for sure (Ithink that is what an average Indian family orders). My dad never liked the Paneer Sabzis  but was a big fan of the Tandoor Paneer Tikka. So I thought I should give it a try and impress my dad when he visits me next in US.

Ingredients:
Paneer - 500 gms/1 LB
Yogurt - 2 tbspn
Chaat masala - 1 tbspn
Tandoor Masala - 2 tbspn (Available in Indian Stores)
Lime Juice - 4 tbspn
Ginger-Garlic Paste - 1 tbspn
Red Chilli Powder - 1 tspn
Onions - 1 large (Cut into cubes)
Bell Peppers - 2 medium sized (Cut into cubes)\
Salt

Method of Preparation:
  1. Cut the Paneer in larger cubes. Make sure they are a little larger so that they dont break when you put them in the skewers.
  2. Mix the ginger-garlic paste, red chilli powder, tandoor masala, 1 tbspn lime juice, salt and yogurt together.
  3. Add in the paneer, onions and peppers to it and marinate it for atleast 2 hours.
  4. Now arrange the paneer, onions and  bell peppers on the skewers in an order
  5. Place the skewers on an aluminium foil in the broiler (on High) for 5-7 minutes each side. Do not overcook it or the paneer will become chewy.
  6. Remove from broiler and sprinkle chaat masala and some lemon juice on it and relish it with mint chutney.
Variations:
You can also add 1 tbspn of chicken curry powder to the marinade to get a different taste.
You can spread some Mint Chutney on a Tortilla and make a wrap of the Tandoori Paneer Tikka you just made!

Conclusion:
My dad is in India, so he couldn't try it but for now my husband tasted it and really loved it. Hopefully you all love it too!


January 20, 2011

Bharwa Bhindi (Stuffed Oakra/Bhindi Masala)


We were being hosts for the December(2010) last weekend which was a vacation for me and my husband. So we had a few friends and family visiting us from all over US. Our friends (Deepak & Aditi) who studied with us at USC (University of Southern California) live in San Jose and often read my Facebook posts on cooking. So I decided to cook some Chicken curry and Shrimp Biryani for them. My only problem was that Aditi was Vegetarian! I looked in my refrigerator and found Bhindi/Oakra and immediately thought of Bharwa Bhindi.

Ingredients:
Bhindi /Oakra (Washed & Dried) - 1LB
Onion - 1 medium sized
Coriander Powder - 2 TBspn
Cumin Powder - 2 tspn
Sambhar Powder - 2 tspn
Amchur Powder - 1/2 tspn
Red Chilli Powder - 1 tspn
Turmeric Powder - 1/2 tspn
Salt - 2/3 tspn
Oil - 2 TBspn

Method of Preparation:
  • Slit the Bhindi/Oakra lengthwise and keep it aside.
  • Now mix all the powders together.
  • Fill the Bhindi/Oakra with the mixture.

  • Now cut the onion into half and now make vertical slices.
  • Put 1 Tbspn oil in a pan and saute the onions till slightly translucent

  • Now add the Bhindi/Oakra to the pan and saute them on High Flame. Add the remaining oil after 2 mins and then lower the heat to Medium.
  • Occasional stirring is required so that it doesn't burn but do not stir it too much else the masala will fall out.
  • Quick and easy Bharwa Bhindi/Stuffed Oakra will be ready in 10 minutes.
  • Now take a picture of the end result and sit back and enjoy it!!

Variation:
You can use Lime juice instead of amchur powder. Also, if you have curry leaves chutney or powder, you can add that to the powder mixture.

Conclusion:
My friends really loved it and also asked how I made it. My husband loves this kind of Bhindi/Oakra over other styles. The sambhar powder does the magic!!